Using Objects by Drawing
Python is an object-oriented programming language. It uses objects as an organizing principle for code. While code organization is a more advanced concept we won’t discuss much in this course, we will need to use objects (rather than author them) to take advantage of Pythons’ expansive library. As a vehicle for learning how to use an object, we’ll use the drawingpanel class which acts as a wrapper around Python’s standard library for graphical user interfaces (GUI)
Summary (Notes)
The Drawing Panel Module
Download the source file containing the drawingpanel.py class here:
To use the class, we must import its containing module first. The module here is simply the filename. We import a module by using the import statement:
from drawingpanel import *This imports all of the classes, functions, etc., declared in drawingpanel.py and makes them available to us in our program. Make sure to include this line at the top of your file!
Using the DrawingPanel Object
Here is a skeleton of a main function creating a Drawing Panel and then drawing on it.
def main():
    panel  = DrawingPanel(100, 100)
    panel.set_background("purple")

    canvas = panel.canvas
    canvas.create_oval(0, 0, 100, 100, fill="green", outline="blue")

    panel.mainloop()
DrawingPanel is a class, a blueprint for creating an object and a specification of what object provides as far as state and behavior that we can use. To create a DrawingPanel, we invoke its constructor by calling the name of the class like a function. The DrawingPanel constructor expects two arguments, the width and height of the panel. The constructor returns a new instance of the DrawingPanel class which we can then use.
One way to use an object is to call a method on it. A method is a function that is part of an object. The syntax for a method call or invocation is similar to a function but requires an object:
<expression>.<method name>(<arguments>)The “dot notation” used here can be thought of as accessing a particular method of a particular object (denoted by the expression to the left of the dot). For example, the method call panel.set_background("purple") calls the set_background method on the panel object.
In addition to methods, we can access fields of objects. Think of a field as a variable that is tied to a particular object. The syntax of a field access is:
<expression>.<field name>Like a normal local variable, we can use the value stored in the field or modify the field’s contents using assignment. The line canvas = panel.canvas creates a new local variable called canvas, assigning it the value stored in the canvas field of the panel object. The panel.canvas field contains the panel’s Canvas object which we use to draw onto the screen.
Note that even though the local variable and the field share the same name, the choice of name of the local is still arbitrary, and there is no link between the local and the field other than the fact the after the assignment canvas refers to the same canvas stored in panel.canvas. We could have performed the local variable initialization c = panel.canvas and the effect would be equivalent (modulo the change of name from canvas to c).
DrawingPanel Reference
To set the background color, call the set_background(color) method of the DrawingPanel object:
panel.set_background(color)
The color is a string drawn from the following choices:
To draw shapes, use the following methods on the DrawingPanel’s Canvas object:
canvas.create_line(x1, y1, x2, y2)canvas.create_rectangle(x1, y1, x2, y2)canvas.create_oval(x1, y1, x2, y2)canvas.create_text(x, y, text='text')
To specify the color of a shape, use the fill and outline named parameters of these methods:
canvas.create_rectangle(x1, y1, x2, y2, fill=color, outline=color)
A full reference for the Canvas class can be found here:
Warm-up: Boxes in Boxes
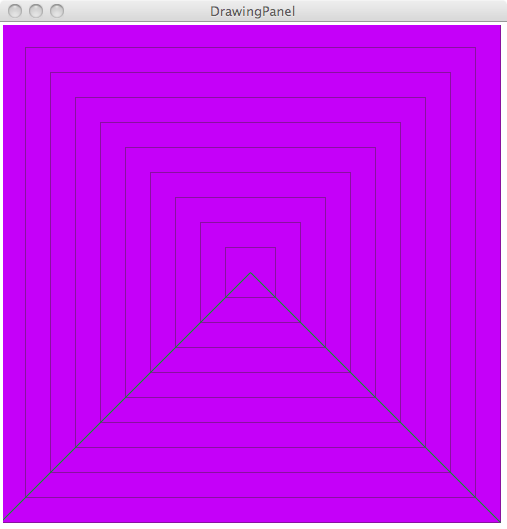
First, in a Python program in a file called drawings.py, write a function boxesinboxes() that draws a series of concentric boxes to the screen.

The DrawingPanel itself is 500x500. For the rest of the figures:
- There are 10 rectangles evenly spaced out. The largest rectangle’s upper-left corner is at (0, 0) and has width 500 and height 500. It has a DarkOrchid4 outline and purple fill color.
- There are two lines with end points (0, 500), (250, 250) and (250, 250), (500, 500) respectively. Both have forest green fill.
Ehrenstein Illusions
Many optical illusions rely on a series of patterns in order to generate their effect. A well known optical illusion is the Cafe Wall Illusion. In reality, the cafe wall illusion is simply alternating rows of black and white squares. However, they are offset and thus give the illusion of being sloped when really they are straight lines. Drawing such figures can be tedious because of their repetitive design which makes them an excellent candidate to be drawn by a computer program.
We’ll be drawing Ehrenstein illusions, another optical illusion that consists of concentric circles with diamonds inside. Since you wrote the computer program that rendered the drawing, you’ll know that the diamond structure is indeed made of straight lines. But if you just stare at the drawing instead, you’ll swear that some of them are curved!
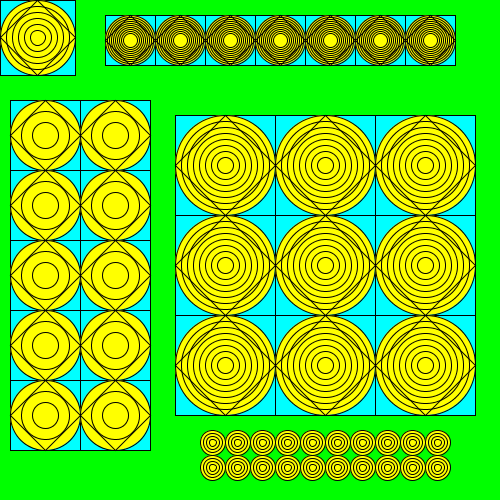
In your ehrenstein.py file, write a function ehrenstein() that produces the drawing below:

Here are some of the basic properties of the above the drawing.
- The DrawingPanel is 500x500 pixels.
- The background of the DrawingPanel is green.
- The background of each square is cyan, the background of the circles are yellow, and the lines themselves are black.
The interesting bits of the drawing are the five figures it contains. Here are their properties.
| Location | Position | Size of subfigure | Number of circles | Size of grid | Miscellaneous |
| Top-left | (0, 0) | 75x75 | 6 | N/A | N/A |
| Top | (105, 15) | 50x50 | 10 | 7x1 | N/A |
| Left | (10, 100) | 70x70 | 3 | 2x5 | N/A |
| Middle | (175, 115) | 100x100 | 8 | 3x3 | N/A |
| Bottom | (200, 430) | 25x25 | 4 | 10x2 | Only circles (no diamond/box) |
Your goal is to reproduce this drawing almost exactly (See addendum paragraph below). Note that because of differences in how Python renders shapes on different operating systems, the panel may render slightly differently on your machine versus what is in the above picture, e.g., a circle may become more pixelated. As long as your output looks identical on visual inspection, you will receive full credit for the output.
Design
First of all, remember to download drawingpanel.py from the links mentioned in the introduction. drawingpanel.py needs to reside in the same directory as your own .py files.
Also, remember to include the following line at the top of your program
from drawingpanel import *which will tell Python to import all the names found in the drawingpanel module including the DrawingPanel class.
Like the previous homeworks, you should be on the look out for places to decompose the problem into smaller pieces in order to get full credit for design. To get you started, here are two functions that you should include in your program:
A function that draws Ehrenstein circles. A single combination of a box, diamond, and set of concentric circles makes up a Ehrenstein circle. Note that this subfigure appears repeatedly throughout the diagram albeit with different positions, sizes, etc. Your function should be flexible nought to account for these possibilities.
The circles themselves are evenly spaced concentric circles. To get a sense of how to draw such figures, you should think of the differences in the radii of the circles as in the following diagram containing 7 concentric circles:

r is the radius of the outer-most circle and a is the distance between successive concentric circles. a is a very important value in computing the relationship between the location and size of each successive concentric circle.
A function that draws a grid of Ehrenstein circles. Given your function to draw a single Ehrenstein circle, you should then construct a function to draw a grid of Ehrenstein circles. You can then use this function to construct each of the grids in the above diagram. This function will need many parameters since in addition to controlling the size of the grid, you will also need to control the particulars of the Ehrenstein circles within the grid.
There is more decomposition that should occur in this homework. Your job is to identify it and write functions to deal with those pieces accordingly.
In general, decomposition is the right way to tackle a problem like this. Breaking a down a seemingly-impossible problem into smaller problems until they look doable is a cornerstone of algorithmic thinking, something you can accomplish here in a very visual way.
Incremental development
In addition to decomposition, you should also exercise your skills in incremental development. In this homework, you need to write functions that generalize to many scenarios. Starting with a function that has many parameters to begin with may be difficult because you won’t immediately see how they should be used. Instead, try writing functions that take no parameters, e.g., a function that draws a fixed number of concentric circles to some place on the screen. From there, generalize the function incrementally by adding a parameter, checking to see if everything works as expected, and then repeating the process until your function can handle all the cases it needs to.
