{{FULL_COURSE}} Homework 4 - OpenGL Basics
Overview
-----
You will learn how to work with the OpenGL API by writing most
of the C++ code necessary to assemble a basic rendering pipeline.
This process will include creating the vertex data for a 2D polygon,
writing GLSL shader code to draw your polygon, and setting up the
data buffering and draw calls necessary to communicate between CPU
and GPU.
Supplied Code
---------
Click here to access
the homework's Github repository.
This code provides you with a basic Qt GUI containing a `QOpenGLWidget`
to draw your scene.
Tips to Get Started
-------------
Before you begin writing code, take a moment to familiarize yourself with the base code of the project:
The class `MyGL` represents the Qt
GUI element that will perform all of your OpenGL rendering. It is given to you with several member variables and functions; carefully read all of the comments that describe these variables and functions so that you understand how to work with them.
Whenever your program is run, `MyGL` automatically calls a few functions; after `MyGL`'s constructor has been invoked,
`initializeGL()` is then called. We have written code in this function
for you that creates a connection between MyGL and the GPU
(`initializeOpenGLFunctions()`), and some more code that sets up the
VAO, shader program, shader program variable handles, and geometry
data. You will have to complete the implementation of some of these
functions, as outlined in the instructions below. After `initializeGL()`
has completed, `MyGL` then calls `resizeGL()` in order to allow you
to receive up-to-date screen width and height data. Finally, `MyGL`
calls `paintGL()` once after it is initialized. Should you wish
to call `paintGL` again to repaint the screen, you should instead
call `MyGL::update()`, which makes the appropriate internal updates
to `MyGL`'s `QOpenGLWidget` superclass. __You should not call `paintGL` directly!__
Debugging your OpenGL API calls
----------
We have also provided you with a function to call whenever you want
to check the error messages from OpenGL: `MyGL::printGLErrorLog()`,
located in `mygl_debugging_functions.cpp`. Call this function
just after each OpenGL API call that you think may be causing
a problem with your program, then place a breakpoint within the
body of the `if` statment of `printGLErrorLog`. Assuming you
have called `printGLErrorLog` after __each__ OpenGL API call,
then whichever API call was made just before your breakpoint was
triggered is the cause of your error.
Shader program errors
-----------
When writing GLSL shader code, do not place any faith in Qt Creator's
in-editor error highlighter. It doesn't know how to parse GLSL code,
so it may give you false errors.
Instead, in order to check whether or not your shader code compiles,
you must run your C++ program. Shader code is compiled when your
C++ code is run, not when your project is built. If your vertex or
fragment shader have any errors, they will be printed in the console
output of your program, and will list the line number in the program
at which they exist.
Conceptual Questions (Due Tuesday, February 20 at 11:59 PM)
-------------
Before you begin the programming portion of this homework assignment, read and answer the following conceptual questions. Your answers should be submitted to Canvas.
* (5 pts) In the OpenGL Shading Language (GLSL), what is a uniform variable?
What is an "in" variable? What is an "out" variable? How does a vertex shader
pass data to a fragment shader?
* (5 pts) `MyGL` contains two member variables that are `std::unordered_map`s. What do the `GLuints` that these maps store
represent? How are they assigned values in the first place?
Help Log (5 points)
-------
Maintain a log of all help you receive and resources you use. Make sure the date
and time, the names of everyone you work with or get help from, and every URL
you use, except as noted in the collaboration policy. Also briefly log your
question, bug or the topic you were looking up/discussing. Ideally, you should
also the answer to your question or solution to your bug. This will help you
learn and provide a useful reference for future assignments and exams. This also
helps us know if there is a topic that people are finding difficult.
If you did not use external resources or otherwise receive help, please submit
a help log that states you did not receive external help.
You may submit your help log as an ASCII (plain) text file or as a PDF. Refer
to the Policies section of the course web site for more specifications.
Code Requirements (Due Thursday, February 22 at 11:59 PM)
-------
We __strongly__ recommend making liberal use of the provided
debugging function, `printGLErrorLog()`, as you implement
each of the following requirements. Make sure to follow the
instructions in the "Debugging your OpenGL API calls" section
above in order to test your code. It is __not__ advisable to
write a large block of code and then try running your program;
you might consider test-running after each OpenGL API call
you write so that you limit the search space for any errors you
encounter.
### Creating vertex buffer object data for your polygon (20 points) ###
Implement the function `initializeAndBufferGeometryData()` so that
it creates vertex position data representing a convex polygon with
at least twenty sides (when rendered, it will look more or less
like a circle). Its vertices should fit within in the range [-1,1] in X and Y, and its Z coordinate should be 1 (technically its W since it's going to be 2D geometry). Additionally, write code that sets up index data
to triangulate that shape using the fan method, as you did in the
previous homework assignment. Finally, make some OpenGL API calls
to pass this data from the CPU to the GPU, associated with the
CPU-side data handles `bufferPosition` and `bufferIndex`. There
are comments provided in this function to help you choose which
OpenGL functions you need to call.
### Acquiring shader program variable handles (10 points) ###
Implement the function `getHandlesForShaderVariables()` so that
it queries your shader program for the unique IDs of the variables
written in the provided GLSL files. Store these `GLuint` IDs as the values within the `shaderUniformVariableHandles` and
`shaderAttribVariableHandles` members of MyGL. The keys of these maps
should be the names of the variables the IDs correspond to.
After you add your own code to the vertex and fragment shaders,
you might have to come back to this function to write additional
variable ID queries for any new `in`s or `uniform`s you add.
### Drawing your geometry (20 points) ###
Follow the instructions left in the comments within the function
`MyGL::drawGeometry()` draw the vertex data you buffered in `initializeAndBufferGeometryData()`. Refer to the lecture slides
on CPU-side OpenGL coding for examples on how to configure the arguments
for the functions listed in the comments.
Once you have correctly implemented this step, you will be able to run your program and see something like the following shape on your screen (its size may differ depending on how large you made your polygon; this shape has a radius of 0.5):
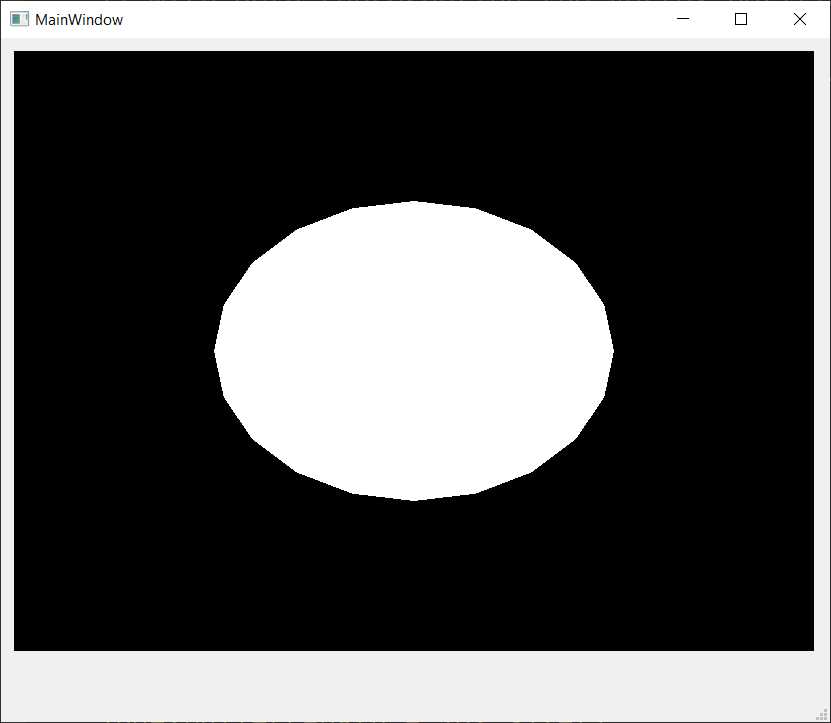
Note how because the screen has a non-uniform aspect ratio, the polygon
is stretched horizontally. You will correct for this in the next step.
### Passing screen dimensions to the shader (5 points) ###
Within `resizeGL`, you should call the `glUniform2i` OpenGL API function, giving it the ID handle associated with `"u_ScreenDimensions"`, and the `w` and `h` values passed into `resizeGL`. Then, in `passthrough.vert.glsl`, divide your vertex's
X coordinate by your aspect ratio: ```(float(u_ScreenDimensions.x) / u_ScreenDimensions.y)```.
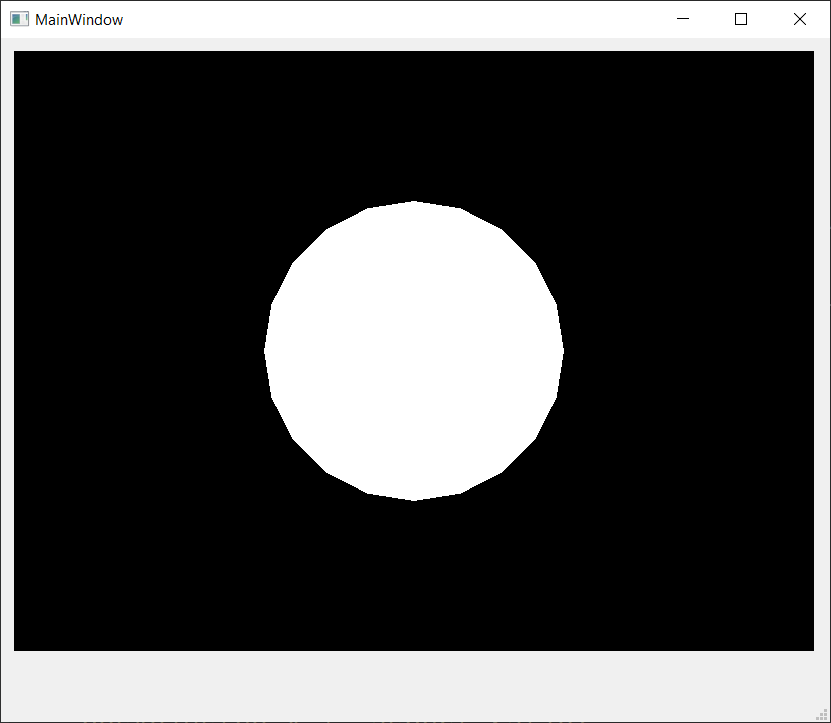
Once you have correctly adjusted for the aspect ratio, your image should look something like this:
### Applying interesting fragment colors (20 points) ###
Inside `coloring.frag.glsl`, add code that sets `out_Col` to a color
value somehow dependent on the fragment's location on screen, such as by using `gl_FragCoord` or passing the vertex position to be interpolated in the fragment shader via a pair of `in/out` variables.
How you choose this coloring is entirely up to you; it just has to
be dependent on the fragment location in some way. You could even
choose to alter the color based on the `u_Time` variable.
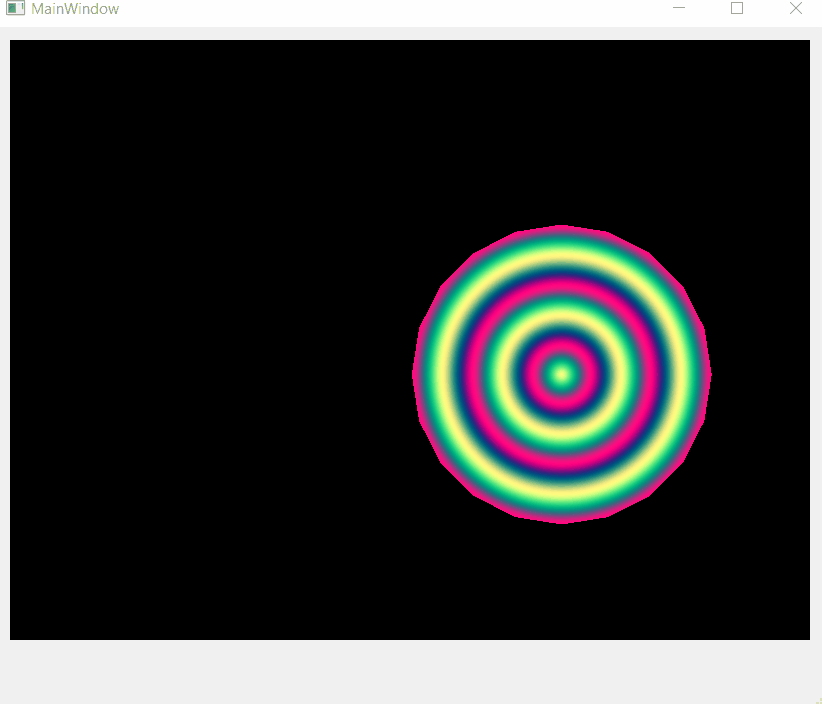
### Applying an animated model matrix (25 points) ###
Within `drawGeometry()`, use the OpenGL API function `glUniformMatrix3fv` to set the `u_Model` variable in your vertex shader to a transformation matrix. The transformation should depend
on `MyGL's` `currTime` member, which you should increment in `tick()`. The animation can be anything you like; we suggest adding some additional member variables to `MyGL` to help you update the movement, such as a variable for position or velocity. Below is one example of an animation, __but you do NOT need to make anything like it if you have other ideas__.
Extra Credit (Maximum 15 points)
---------
We will grant you extra credit if we deem your interesting fragment colors or animated object to be particularly complex or interesting. Take time to experiment with
different functions, both in your vertex shader and fragment shader, to produce
visually interesting results. If you want to spend the time, you could even
hard-code some sort of artistically-driven animation of your polygon based on
the `u_Time` variable that all your shaders support.
We have also provided you with the `mouseMoveEvent` function should you wish to add mouse interactivity to your shader.
Submission
--------
We will grade the code you have pushed to your GitHub repository, so make sure
that you have correctly committed all of your files! Once you have pushed your
finished project to GitHub, submit a .zip of your project to Canvas, and add a comment with a link to your repository.