{{FULL_COURSE}} Final Project - Mini Minecraft Milestone 2
Overview
-----
You will continue your implementation of Mini Minecraft, adding
detail and/or efficiency to your existing project. Each group member may choose
any one of the milestone features to implement; you are not beholden
to implement the procedural terrain feature this milestone just because you
implemented procedural terrain for Milestone 1.
#### Again, please note that late days cannot be used for the final project milestones ####
Supplied Code
---------
You'll be working from the code your group wrote for milestone 1.
The textures needed for the texturing milestone requirement can be found in the `textures`
folder in the root of the repository.
Additional block types
----------------------
In addition to the `STONE`, `DIRT`, and `GRASS` block types defined in the base
code, you should add the following blocks to your `BlockType` enum:
* `LAVA`
* `BEDROCK`
You may add block types beyond these requirements as you see fit.
Help Log (5 points)
-------
Maintain a log of all help you receive and resources you use. Make sure the date
and time, the names of everyone you work with or get help from, and every URL
you use, except as noted in the collaboration policy. Also briefly log your
question, bug or the topic you were looking up/discussing. Ideally, you should
also the answer to your question or solution to your bug. This will help you
learn and provide a useful reference for future assignments and exams. This also
helps us know if there is a topic that people are finding difficult.
If you did not use external resources or otherwise receive help, please submit
a help log that states you did not receive external help.
You may submit your help log as an ASCII (plain) text file or as a PDF. Refer
to the Policies section of the course web site for more specifications.
Week 2 Milestone Features (75 points each, Due Tuesday, April 11 at 11:59 PM)
-------
For the second milestone of Mini Minecraft, each group member will implement a
feature that adds detail or efficiency to your existing game engine. As with
the first milestone, each group will present their completed work in the form
of a pre-recorded video submitted alongside their code. This video must be no longer than four minutes
in length, and it must show each feature implemented as it appears when the
program is run. Only footage of your game is required; you do not need to record
voice-over if you prefer to add text annotations to the video instead.
The three main milestone features are:
* Procedural generation of caves using 3D noise
* Texturing and texture animation in OpenGL
* Multithreading of terrain loading
### Cave Systems ###
You will implement two main features:
* In addition to the 2D height fields used to generate surface terrain, you will
add the computation of 3D noise to generate cave systems beneath the terrain's surface.
* You will introduce a post-process rendering pipeline into your game engine
to render an overlay when the player's head is beneath water and lava.
Extend the Perlin noise algorithm discussed in the Noise Functions slides to work in
three dimensions; this will require sampling eight surflets rather than four (one for each
corner of a 3D grid cell) and using trilinear interpolation on their values. Sample this
3D Perlin noise at every block whose Y coordinate is in the range [1, 128]. Whenever the
value of this Perlin noise is negative, the block at the sampled coordinates should
be set to `EMPTY`, unless its Y value is less than 25, in which case it should be
set to `LAVA`. Finally, all blocks at Y = 0 should be made `BEDROCK`, and made to be
unbreakable when left-clicked. The end result will be a system of somewhat-interconnected caves
with pools of lava at the lowest depths.
If you would like cave openings to be more frequent on the surface of your terrain, then
increase the ceiling of Y values at which you sample your Perlin noise to allow carving out
the surface height field as well.
__Note:__ If you are testing your cave generation without the multithreading portion of
milestone 2 working on your local implementation of the project, it is useful to shrink
the range of Y coordinates that can contain cave structures (e.g. only Y = [64, 128] or
even smaller). Sampling a noise function at every XYZ below Y = 128 can take a long time
and will make loading your initial scene very slow on a single-threaded program.
During the player's collision detection function, `WATER` and `LAVA` blocks
should __not__ cause the player to stop moving. Instead, the player should move
at 2/3 its normal speed (both in terms of gravity and lateral movement) and
should be able to swim upwards at a constant rate by holding `Spacebar`.
Additionally, when the player's `Camera` is inside a `WATER` block, the
screen should be tinged blue, while a `LAVA` block should
cause a red tinge. You should create these overlay effects by setting up
a post-process pipeline like the one in hw04, and render your 3D scene
to a frame buffer, then render the frame buffer's texture to a screen-spanning
quadrangle with a new shader program. We have created a `FrameBuffer`
class to assist you in this process, which you can download [here](framebuffer.zip).
__Note that because your team will be using alpha blending this milestone, your
post-process fragment shader should output a `vec4` for its color, otherwise you
will have uninitialized transparency which will cause rendering errors.__
### Texturing and Texture Animation ###
For this week's OpenGL feature, you'll have to implement several components:
* A way to load images as textures into OpenGL for your world.
* An addition to `lambert.frag.glsl` that makes use of a `sampler2D` to apply
texture colors to a surface.
* An alteration to `lambert.frag.glsl` so that it includes a time variable as in
Homework 5's OpenGL Fun, and uses this variable to animate the UVs on a `LAVA`
block and `WATER` block. You may use a branching statement (i.e. IF statement)
in your shader so that only `LAVA` and `WATER` are animated.
* Enabling alpha blending in `MyGL::initializeGL` so that transparency can be
applied to `WATER` blocks.
* Split your interleaved VBO data in the `Chunk` class into two separate VBOs:
one for data for all opaque blocks and one for data for all transparent blocks.
* An alteration to the VBO for the `Chunk` class, so that it additionally
supports UV coordinates (vec2). You may also consider
adding some sort of "animateable" flag to your VBO so that only triangles with
the `LAVA` and `WATER` textures are animated in your shader.
* Additional variables in the `ShaderProgram` class to support these texture
features.
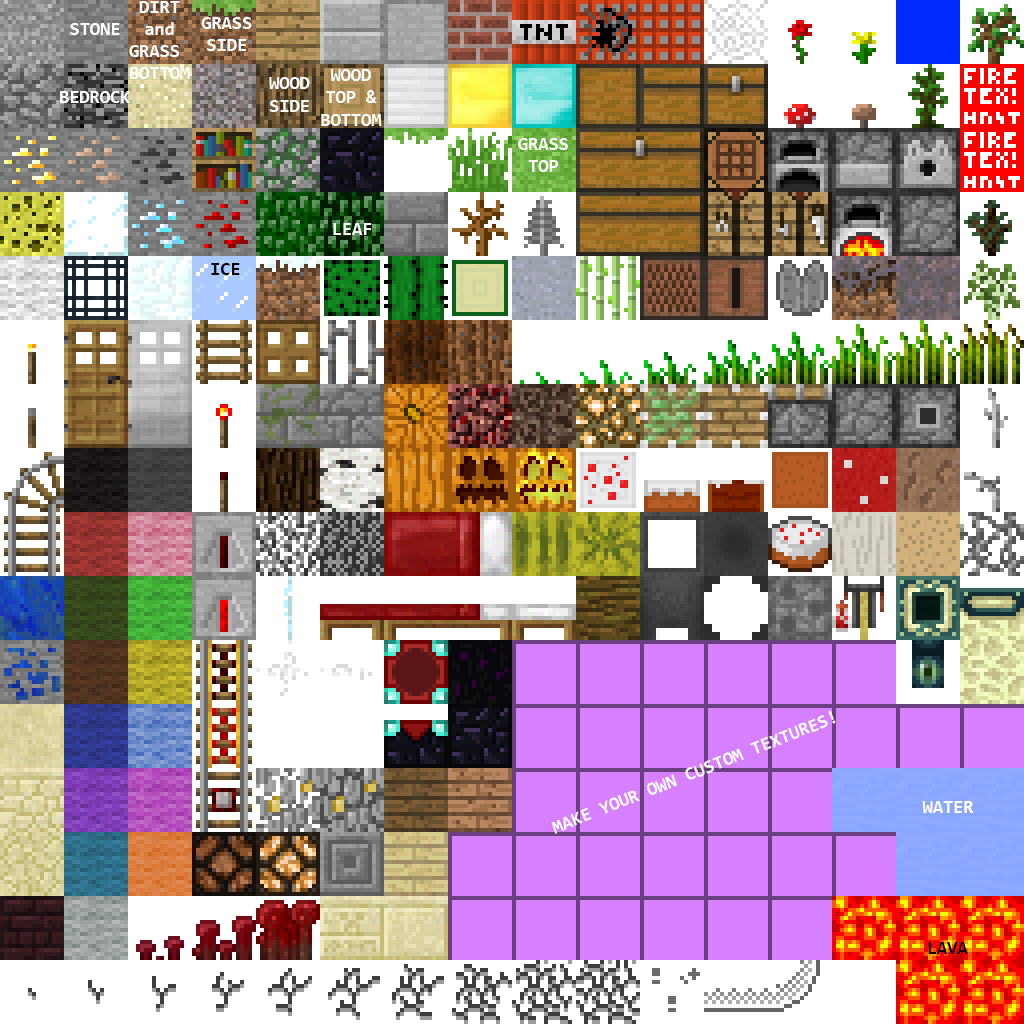
Using the `BlockType` of a given block, set the UV coordinates of a square face
in the `Chunk` VBO so that they correspond to the appropriate texture square in
the image below. For example, if you were adding the VBO data for the top of a
`GRASS` square, then you'd set the square's UVs so they aligned with the texture
area labeled `GRASS TOP` (see image below). If you want to test block
appearances, you might consider setting keyboard input that has the Player
place a particular block in front of them. Remember that UV coordinates have a range of 0 to 1; the image below is divided into 16x16 block faces, so a single block face
ranges from `<x, y>` to `<x+1/16, y+1/16>`.
You may wish to refer to the base code provided for homeworks 4 and 5 to see how
to read an image file and pass it to your GPU, and associate the texture with a
`sampler2D` in a shader. Note that the OpenGL homework base code uses a `.qrc`
file to let Qt know that it should include the texture files in its working
directory, so that they may be found using the ":/" directory regular expression.
When a block is a `LAVA` or `WATER` block, its UVs should be offset in your GLSL
shader based on an incrementing time variable. Note that there are rows of
`WATER` and `LAVA` face textures in the provided texture image; you can
repeatedly move the UVs of a `WATER` block or `LAVA` block across this row to
give the illusion of moving fluid across the block surface.
In order for transparency to work properly for `WATER` blocks, you will need to
add the following two lines of code to `MyGL::initializeGL`:
* `glEnable(GL_BLEND);`
* `glBlendFunc(GL_SRC_ALPHA, GL_ONE_MINUS_SRC_ALPHA);`
These tell the OpenGL pipeline that it should use the alpha channel (i.e. the
W coordinate) of a fragment's color `vec4` to blend that fragment with the other
fragments for its pixel. An alpha of 1 means the fragment is fully opaque, while
an alpha of 0 means the fragment is fully transparent.
Note that the order in which triangles are rendered
will affect how the alpha blending appears, but we aren't going to worry about
that for this milestone. Once you've set these flags, you'll need to modify
the code that builds a `Chunk`'s VBO so that opaque blocks which are adjacent
to transparent blocks have their faces added to the VBO data. This will allow
terrain beneath the water to be rendered. The provided texture contains alpha
channel information implicitly, so you shouldn't need to add an alpha attribute
to your `Chunk` VBOs.
As noted in the list above, you'll need two interleaved VBOs in your `Chunk`
class. The first will contain all opaque blocks (e.g. `GRASS`, `STONE`,
`LAVA`), while the second will contain all transparent blocks (e.g. `WATER`,
`ICE`). `MyGL` should render all opaque VBOs first, then all
transparent VBOs so that the OpenGL pipeline can correctly sort the rendered
triangles according to their alpha (transparency) values.
### Multithreaded Terrain Generation ###
For this milestone feature you will add multithreading functionality
to prevent the gameplay from slowing down
when new terrain is generated to expand the world.
To implement multithreading, you may use any of the multithreading libraries
available. However, we recommend either the C++ standard library `std::thread` and
`std::mutex` classes, or the Qt library `QRunnable`, `QThreadPool`, and `QMutex`
classes. You can download an example program showcasing both these libraries
[here](multithreading_file_write.zip) (we will have a lecture exploring this
example as well).
To begin, you will need to modify how your program's terrain expansion process works.
Every `tick`, your terrain should look at every "terrain generation zone" that lies
within a radius of two zones away from the player's current position. In other words,
every frame your program should examine a 5x5 set of terrain generation zones centered
on the zone in which the `Player` currently stands, which is really a 20x20 set of
`Chunk`s. For every terrain generation zone in this radius that does __not__ yet exist
in `Terrain`'s `m_generatedTerrain`, you will spawn a thread to fill that zone's `Chunk`s
with procedural height field `BlockType` data. We will designate these threads as
`BlockTypeWorker`s. For every terrain generation zone in this radius that __does__ exist
in `m_generatedTerrain`, you will check each `Chunk` it contains and see if it already
has VBO data. If it does not, then you will spawn another thread we will designate a
`VBOWorker` to compute the interleaved buffer and index buffer data for that `Chunk`.
However, `VBOWorker`s will not pass data to the GPU as threads that are not the main
thread do not have an OpenGL context from which to communicate with the GPU. We will
explain `BlockTypeWorker`s and `VBOWorker`s below.
Both worker thread types need to communicate with your main thread (i.e. the thread running
your Mini Minecraft executable) through shared memory. For `BlockTypeWorker`s, you will push
back filled `Chunk`s into a collection of `Chunk*`s stored in `Terrain`. The kind of collection you
use is up to you, but we recommend a `std::unordered_set` or `std::vector`. For
`VBOWorker`s, we highly recommend creating a `struct` or `class` to hold four separate
`std::vector`s of opaque and transparent vertex and index data for your `Chunk` VBOs, then
storing a `std::vector` of these `struct`s in `Terrain`, and add to that collection from
each `VBOWorker`. In `Terrain`, every `tick` after attempting to spawn additional
threads you should check on the state of these data collections by sending filled
`Chunk`s to new `VBOWorkers`, and sending completed VBO data to the GPU.
To ensure that `Terrain` and the two worker constructs don't modify their shared
memory at the same time, you should make use of mutexes. Designate one mutex for
each shared memory structure in `Terrain`. Any time you read from
or write to one of these shared memory locations, you should lock the corresponding
mutex, and unlock the mutex when you're done with the shared memory.
Submission
--------
#### Make sure your group commits a readme.txt that explains which group member implemented which feature for this milestone! ####
Additionally, in your readme, briefly describe __how__ you implemented your
chosen features. Discuss any difficulties you encountered when coding the
project, and explain the approach you took to implementing each feature (e.g.
"I chose to cast rays from the corners of my player's bounding box for collision
detection because I thought it might be an easier approach than overlap
checking.")
__Your group will present a pre-recorded video of your milestone implementations
in class on Monday; you must submit the video to the course dashboard along with
your commit link!__
We will grade the code you have pushed to your GitHub repository, so make sure
that you have correctly committed all of your files! Once you have pushed your
finished project to GitHub, submit a link to your commit through the course
dashboard. If you click on the Commits tab of your repository on Github, you
will be brought to a list of commits you've made. Simply click on the one you
wish for us to grade, then copy and paste the URL of the page into your text
file.
#### Each group member should submit a commit link to the course Dashboard! ####