{{FULL_COURSE}} Final Project - Mini Minecraft Milestone 1
Overview
-----
The overall goal of this project is to create an interactive 3D world exploration and alteration program in the style of the popular computer game Minecraft. This is a group project, with groups consisting of three people. Every ten days for the next five weeks, each member of your group will complete a milestone feature of the project. Please note that late days cannot be used for the milestones of this project since your partners' features may depend on your own feature implementation. The first two milestones are set features, but the final milestone specifications may be entirely of your own choosing; a huge number of possible extensions to this project are possible.
Each milestone, there will be three main features for your group to complete. Each member of your group must choose one of these features to implement, and must implement his or her chosen feature by himself or herself. Each group member will receive a grade for the feature he or she implements; your grade each week is dependent on your work. Additionally, at the end of the project you will evaluate your group members' cooperation; this evaluation will factor into your grade and your partners' grades.
Since the features of each week affect the features of the following week, you must use version control to collaborate on this project. As with all assignments in this class, you will use Git and Github to track your code. It is a good idea for each member to create a code branch for their chosen feature, so that when they commit their code to the repository it does not cause problems for other group members. By the time a milestone is due, each member should merge his or her branch back into the Master branch so that you have uniform basecode from which to work in the next week.
#### Again, please note that late days cannot be used for the final project milestones ####
Supplied Code
---------
Click here to access
the homework's Github repository.
Help Log (5 points)
-------
Maintain a log of all help you receive and resources you use. Make sure the date
and time, the names of everyone you work with or get help from, and every URL
you use, except as noted in the collaboration policy. Also briefly log your
question, bug or the topic you were looking up/discussing. Ideally, you should
also the answer to your question or solution to your bug. This will help you
learn and provide a useful reference for future assignments and exams. This also
helps us know if there is a topic that people are finding difficult.
If you did not use external resources or otherwise receive help, please submit
a help log that states you did not receive external help.
You may submit your help log as an ASCII (plain) text file or as a PDF. Refer
to the Policies section of the course web site for more specifications.
Week 1 Milestone Features (75 points each, Due Thursday, April 1 at 11:59 PM)
-------
For the first week of Mini Minecraft, each group member will implement a feature
that forms the basis of the game engine. On the due date of this milestone,
each group will submit a pre-recorded video of their completed work.
This video must be no longer than four minutes in length,
and it must show each feature implemented as it appears when the program is run.
Only footage of your game is required; you will talk over your video in class,
so there's no need to add title cards or audio.
To record your program, you
might use [OBS Studio](https://obsproject.com/) if you have a machine running Windows or Linux,
or use QuickTime's built-in screen recording capability if you're running Mac
OS.
The three main milestone features are:
* Procedural generation of terrain using noise functions.
* Altering the provided Terrain system to efficiently store and render blocks.
* Constructing a controllable Player class with simple physics.
### Procedural Terrain ###
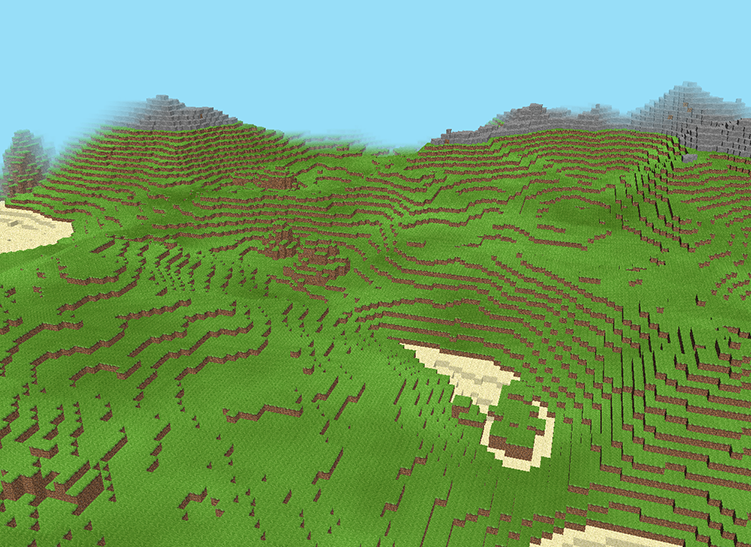
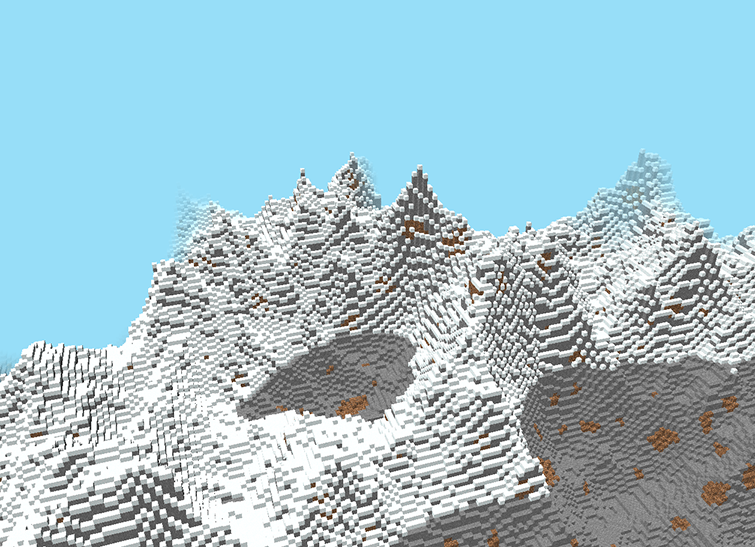
Using noise functions, create a height field for your terrain that represents two
distinct biomes: a rolling grassland hills biome and a jagged mountain biome. More
specifically, you should write two separate functions that each take in an `(x, z)`
coordinate of your Minecraft world and produce a `y` coordinate that represents
the height of the grassland or mountain biome at that point respectively. Then,
interpolate between those two different heights using a third noise function as
the `t` value in a LERP between grassland height and mountain height.
The provided `Terrain` class stores a collection of `Chunk`s, mirroring the way
actual Minecraft stores its terrain. A `Chunk` is a 16 x 256 x 16 section of blocks
stored in a contiguous 1D array. The `Chunk`s are stored in a map of (x, z) coordinate to
`Chunk` within the `Terrain`. Given this data structure, your Minecraft world is infinite
in the X and Z directions, but only spans the range [0, 255] on the Y axis as far as where
blocks can be placed. Given this, your height fields should be able to take in any arbitrary
`(x, z)` coordinate as input, but only output a `y` coordinate in the range [0, 255]. Further,
the terrain you generate should fill the space from Y = 0 to Y = 128 entirely with `STONE`
blocks, and when 128 < Y <= 255, the terrain should be filled with blocks of a type dependent
on the biome and up to a height dictated by the biome's height field. In the grassland biome,
each column should be filled with `DIRT` except for the very top block, which should be `GRASS`.
In the mountain biome, you should fill each column with more `STONE`, but if the column rises
above Y = 200 then the very top block in that column should be `SNOW`.
We have provided some screenshots of our implementation of these biomes as reference
below. Your results do not need to look exactly the same, and will not have textures
applied until the second milestone. We used some variations of Perlin noise such as
`fractal_noise(abs(Perlin(x, z)))` for the mountain biome, and the Voronoi-based hill
effects described on pages 3 and 4 of this [paper](http://web.mit.edu/cesium/Public/terrain.pdf)
for the grassland.
For the third noise function used to interpolate between the biomes,
we used Perlin noise with a very large grid size, remapped it to [0, 1], and used `smoothstep(0.25, 0.75, Perlin)` on it.
This smoothstep effectively increases the contrast of the Perlin noise function to give the biomes more areas
where they exist 100% before interpolating into the other biome.

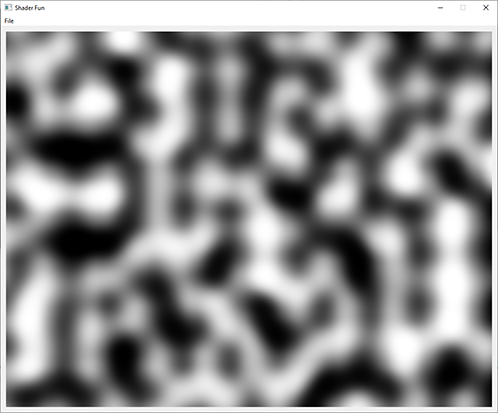
If you'd like to test your noise outside the scope of the provided base code, you
might consider going back to your homework 5 code and adding a post-process
shader that, rather than modifying the image of Wahoo, generates a greyscale
image based on noise.
### Efficient Terrain Rendering and Chunking ###
In the base code we have provided, you have a `Terrain` class, which stores a
`std::unordered_map` of `Chunk`s. A `Chunk` is a simple data structure that
stores a 16 x 256 x 16 collection of `BlockType`s in a 1D array, and a set of
pointers to its four neighboring `Chunk`s in the + and - X and Z directions.
Presently, the base code renders all of the blocks in all of the `Chunk`s by
drawing the same basic `Cube` mesh over and over again with a different model
matrix applied each time, once per block in the terrain. Since this amounts to
hundreds of draw calls per frame, this is very inefficient. It is up to you to
write code that draws the terrain on a per-`Chunk` basis rather than a per-block
basis.
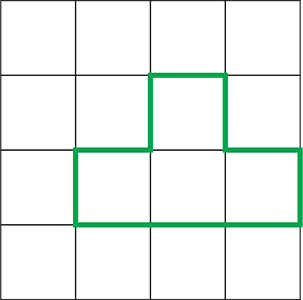
To begin, you should make `Chunk` inherit from `Drawable`, and implement all of
the functions necessary for this inheritance to compile. When you implement the
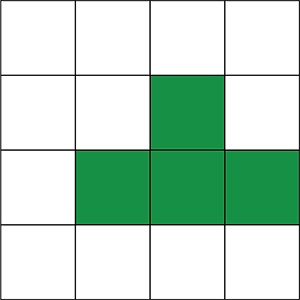
`create()` function for your `Chunk` class, you should only create VBO data for
block __faces__ that lie on the boundary between an `EMPTY` block and a filled
block. In the diagrams below of a 2D Minecraft setup, four blocks have been
filled in. However, only the ten block sides that are on the interface between
a filled block and empty block are rendered.
Additionally, your `Chunk`'s `create()` function should store all the per-vertex
data in an __interleaved__ format in a __single VBO__ (except for indices, which
must be stored in a separate buffer). So, rather than storing your data like
`pos0pos1pos2pos3` `col0col1col2col3` in two VBOs, you'd store your data like
`pos0col0pos1col1pos2col2pos3col3` in one VBO. Importantly, to make the multithreading part of
Milestone 2 easier, you should write a function that takes in a vector of interleaved
vertex data and a vector of index data, and buffers them into the appropriate
VBOs of your `Drawable`.
You must also write a second drawing
function for the `ShaderProgram` class that renders a `Drawable` that has been set
up with interleaved VBOs rather than separate VBOs. Using the example of interleaved
positions and colors, the `glVertexAttribPointer`
associated with `vs_Pos` (a `vec4`) would look like `glVertexAttribPointer(attrPos, 4, GL_FLOAT, false, 2 * sizeof(glm::vec4), (void*)0)`. Likewise, the `glVertexAttribPointer` call for setting up `vs_Col` would look like
`glVertexAttribPointer(attrPos, 4, GL_FLOAT, false, 2 * sizeof(glm::vec4), (void*)sizeof(glm::vec4))`.
Finally, you must implement a function in the `Terrain` class that checks whether a new `Chunk` should be added to
the `Terrain` based on the `Player`'s proximity to the edge of a `Chunk` without a neighbor in a particular direction.
For this milestone, when the player is 16 blocks of an edge of a `Chunk` that does not connect to an existing `Chunk`,
the `Terrain` should insert a new `Chunk` into its map and set up its VBOs for rendering. For this milestone, you do
NOT have to de-load `Chunk`s' VBO data if they are far away from the player. The terrain expansion function should be
called from `MyGL::tick()` so that the game engine performs this check every frame.
### Game Engine Tick Function and Player Physics ###
In Mini Minecraft, we will use the `MyGL` class as our "game engine" construct,
meaning `MyGL` will eventually need to know about all entities of which the
game comprises and will need to handle processing each entity each time the
game updates.
To begin, you should familiarize yourself with the `Entity` class. We have created
this class to represent any object in the Minecraft game world that is not part of
the terrain, such as the `Player`, any `Camera`s, or any AI agents you may choose
to make in a future milestone. Every `Entity` keeps track of its own local coordinate
system, represented by its own world-space position and axes defined relative to the
world-space axes. The `Entity` class also comes with functions to enable easy movement
along its local axes as well as the world-space axes. Importantly, the `Entity` class
declares, but does not define, a `tick` function, which will be implemented by any
classes that inherit from it. This function will encompass any actions an `Entity`
needs to take every frame.
We have provided you with a `Player` class that inherits from `Entity`. This will
represent the player's avatar in the Minecraft virtual world. In addition to
the members inherited from `Entity`, the `Player` stores a `Camera` (which also
inherits from `Entity`) to represent the player's point of view and render the
game world, tracks its velocity and acceleration for smoother physics, and has
a handle to the `Terrain` so the `Player` can interact with it.
Presently, in the base code `MyGL` directly moves the `Player` when a key press
event is registered. You must alter the functionality of `keyPressEvent` so that
an `InputBundle` is constructed and passed to the `Player`'s `processInputs`
function, where the state of the keyboard is read and used to set the `Player`'s
physics attributes and use mouse movement to rotate the camera.
Then, `Player::computePhysics` should be implemented to
move the player based on its acceleration and velocity. The specific numbers
you use for things like gravity, move speed, and acceleration are up to you.
However, the following specifications should be followed:
* The player begins the game in "flight mode", which allows them to move without
being subject to gravity or terrain collisions
* In flight mode, the following behavior occurs based on which keys are currently pressed down:
* W -> Accelerate positively along forward vector
* S -> Accelerate negatively along forward vector
* D -> Accelerate positively along right vector
* A -> Accelerate negatively along right vector
* E -> Accelerate positively along up vector
* Q -> Accelerate negatively along up vector
* F -> Toggle flight mode OFF
* When flight mode is not active, the player is subject to gravity and terrain collisions
(described later). Additionally, the player's movement changes slightly:
* W -> Accelerate positively along forward vector, discarding Y component and re-normalizing
* S -> Accelerate negatively along forward vector, discarding Y component and re-normalizing
* D -> Accelerate positively along right vector, discarding Y component and re-normalizing
* A -> Accelerate negatively along right vector, discarding Y component and re-normalizing
* Spacebar -> Add a vertical component to the player's velocity to make them jump
* F -> Toggle flight mode ON
* In both movement modes, the player's velocity is reduced to less than 100% of its current value
every frame (simulates friction + drag) before acceleration is added to it.
You must invoke `Player::tick` from `MyGL::tick`, and compute the delta-time it requires by polling for
the current time using `QDateTime::currentMSecsSinceEpoch()`. Store the previous frame's `currentMSecsSinceEpoch`
in `MyGL` in order to compute this delta, and make sure to initialize this variable in `MyGL`'s constructor using
`QDateTime::currentMSecsSinceEpoch()`.
In order to collide with terrain, you may assume that the `Player`'s collision volume is in the shape of two
Minecraft blocks stacked on top of one another, always aligned to the world axes, with the `Player`'s position
sitting at the bottom-center of the lower block. The `Camera` controlled by the `Player` always sits 1.5 units
above the `Player`'s position, placing it in the center of the top cube (the player's "head").

Note that this means that the `Player`'s collision volume may not be positionally aligned with the
Minecraft grid (and in fact will almost never be), but will always be rotationally aligned with
the world axes, even if the `Player` is not.
To collide this volume with the terrain, we can make some simplifying assumptions. We discuss this
in more detail in the lecture slides, but if you treat every cube corner of the player's volume as
the origin of a ray with a length equal to the player's velocity times delta time, you can "grid march"
along those rays to determine where, if anywhere, they intersect with the terrain. You can then stop the
`Player`'s movement in that direction to have them "collide" with the terrain. That being said, such
movement is not conducive to smooth gameplay. If you instead check the distance the player can move on
each axis individually (performing one grid march per axis) and limit the movement on each axis separately,
the player will "slide" along walls rather than stopping entirely when touching one, resulting in smoother
gameplay.
Finally, you should enable the player to remove the block currently overlapping the center of the screen
when the left mouse button is pressed, provided that block is within 3 units of distance from the camera.
This can be achieved by casting a ray through the center of the screen and grid marching to determine what
block it hits within 3 units. The player should also be able to place a block adjacent to the block
face they are looking at (within 3 units' distance) by right-clicking.
Submission
--------
#### Make sure your group commits a readme.txt that explains which group member implemented which feature for this milestone! ####
Additionally, in your readme, briefly describe __how__ you implemented your
chosen features. Discuss any difficulties you encountered when coding the
project, and explain the approach you took to implementing each feature (e.g.
"I chose to cast rays from the corners of my player's bounding box for collision
detection because I thought it might be an easier approach than overlap
checking.")
__Your score will be partially based on a pre-recorded video of your milestone
implementations; you must submit a link to the video to the course dashboard along with
your commit link!__
We will grade the code you have pushed to your GitHub repository, so make sure
that you have correctly committed all of your files!