{{FULL_COURSE}} Homework 7 - Skeletons and Skinning
Overview
-----
You will create a basic skeleton joint class and implement functions to
bind a half-edge mesh to the skeleton and deform the mesh based on the
skeleton.
Supplied Code
---------
You will work from the base code supplied for the previous assignment, and
commit your code to the same repository.
[Click here to download the JSON skeleton files to load into your program](jsons.zip)
Conceptual Questions (10 points, Due Monday, March 15 at 11:59 PM)
-------------
* (5 pts) What visual errors may occur when using linear blend skinning for a mesh? Why do these errors occur?
* (5 pts) Since one cannot insert breakpoints into a GLSL shader program, how might one debug a shader? For example, if one were writing a vertex shader that applies a mesh skinning deformation, how might one determine which vertices are influenced by a particular joint? Consider what alterations to your fragment shader might be useful to test this.
Help Log (5 points)
-------
Maintain a log of all help you receive and resources you use. Make sure the date
and time, the names of everyone you work with or get help from, and every URL
you use, except as noted in the collaboration policy. Also briefly log your
question, bug or the topic you were looking up/discussing. Ideally, you should
also the answer to your question or solution to your bug. This will help you
learn and provide a useful reference for future assignments and exams. This also
helps us know if there is a topic that people are finding difficult.
If you did not use external resources or otherwise receive help, please submit
a help log that states you did not receive external help.
You may submit your help log as an ASCII (plain) text file or as a PDF. Refer
to the Policies section of the course web site for more specifications.
Code Requirements (Due Sunday, March 21 at 11:59 PM)
-------
### Joint class (10 points) ###
Write a class that represents a joint in a virtual skeleton structure. Remember
that joints function very similarly to scene graph nodes. Each joint should
contain the following information:
* Name: The name of this joint which will be displayed in your `QTreeWidget` of
joints.
* Parent: The joint that is the parent of this joint.
* Children: The set of joints that have this joint as their parent.
* Position: The position of this joint relative to its parent joint.
* Rotation: The quaternion that represents this joint's current orientation. You may use `glm::quat` to represent your quaternion; make sure to include `` in order to access it.
* Bind Matrix: The inverse of the joint's compound transformation matrix at the
time a mesh is bound to the joint's skeleton.
You joint class should implement a function called `getLocalTransformation`,
which returns a `mat4` that represents the concatenation of a joint's position
and rotation. Your joint class should also implement a function called
`getOverallTransformation`, which returns a `mat4` that represents the
concatentation of this joint's local transformation with the transformations of
its chain of parent joints.
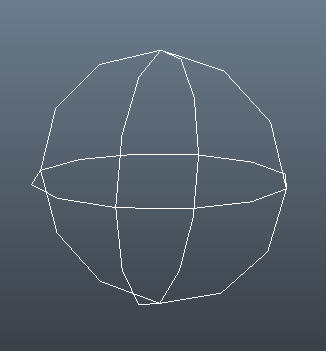
You should be able to draw your joints as wireframe spheres as in the image
below (they should have radii of 0.5). Additionally, a single line should
be drawn from the centerpoint of a joint to the centerpoint of that joint's
parent. The line should be colored with two different colors in order to
indicate the direction of the relationship (e.g. magenta on the parent's end,
yellow at the child's end). Joints should render in front of all other objects
in the scene, regardless of actual position in world space. As with your visual
debugging tools for your half-edge mesh components, you can temporarily disable
OpenGL's depth testing by calling `glDisable(GL_DEPTH_TEST)` then re-enabling it
after drawing the joints.
 
### Skeleton JSON File Reader (10 points) ###
Add functionality to your GUI to enable the user to load a JSON file and parse
it to create a skeleton joint hierarchy in your scene. We've provided you with
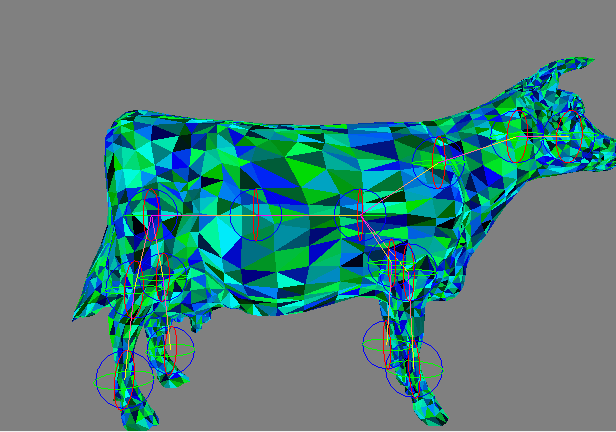
an example skeleton JSON file that you can use with the cow OBJ file. The file
format is fairly self-explanatory, with the exception of rotation. Rotation is
defined as `[angle, axis_x, axis_y, axis_z]` rather than `[w, i, j, k]`. You
will need to use this data to _compute_ a quaternion.
Qt, conveniently, has built-in classes to make parsing JSON files simple. We
recommend taking a look at the documentation for the `QJsonDocument`,
`QJsonObject`, and `QJsonArray` classes.
### Joint Influences on Vertices (5 points) ###
Add member variables to your vertex class that store which joints influence its
transformation and by how much they influence it. We only require that you allow
each vertex to be influenced by two joints, but you may support more influences
if you like.
### Skinning Function (10 points) ###
Add a button to your GUI that calls a mesh skinning function given a mesh and
the root joint of a skeleton. We only require that the skinning function be a
simple distance-based weight assignation, but you can make yours fancier if you
so choose.
### Interactive Skeleton (20 points) ###
Add a `QTreeWidget` to your GUI from which the user can select a joint in your
scene's skeleton. The user should be able to alter the position and rotation of
the selected joint through additional widgets in the GUI. When a joint is
selected, it should change color in the GL view. Since the rotations of your
joints are stored as quaternions, you may choose to implement interactive
rotation as a concatenation with a world-axis rotation (e.g. when the user
presses one button, the joint's rotation is multiplied by a rotation of 5
degrees about the X axis, while another button rotates it by 5 degrees about
the Y axis, and so on). When you transform a joint, it should visually rotate
and translate in the GL viewport. When a joint is selected, its current transformation
should be displayed numerically in the GUI somewhere. Because of the way
quaternions represent rotations, we do not recommend using spin boxes to modify
your joint rotations; simple push buttons will suffice.
### Shader-based skin deformation (30 points) ###
Write a new shader composed of two files: `skeleton.vert.glsl` and
`skeleton.frag.glsl`. Additionally, add another `ShaderProgram` member variable
to `MyGL` called `prog_skeleton` which compiles these two GLSL files. This
shader should transform vertices based on the joints that influence them. This
shader may implement flat or lambert shading in its fragment shader component.
We only require that you implement linear blend skinning. Your shader should
include the following variables:
* Bind Matrices: A `uniform` array of matrices that each describe the bind
matrix of a particular joint. Since GLSL arrays must be assigned a size at
compile time, you may hard-code this to be an array of 100 `mat4s`. When you
use `glUniformMatrix4fv` to write to this variable, make sure to specify the
correct count of matrices you'll be writing to it (which will very likely be
fewer than 100).
* Joint Transformations: A `uniform` array of matrices (or dual quaternions, if
you're implementing the extra credit) that each describe the current overall
transformation of a particular joint.
* Vertex's influencer IDs: An `in` variable that contains the IDs of the joints
that influence the given vertex. We recommend the use of an `ivec2` (or 3 or 4) (as opposed
to a `vec2`) or an array of integers. A joint's ID should correspond to the
index at which its bind and transformation matrices are stored in your arrays.
* Vertex's weights: An `in` variable that describes the weights of the joints
that influence the given vertex. Each element in this set of weights should
align with the element in the ID set that corresponds to the joint this weight
describes. For example, if a vertex had joint IDs [0, 4] and weights
[0.45, 0.55], then joint 0 would have a weight of 0.45 and joint 4 would have a
weight of 0.55 on this vertex. We recommend using a regular `vec` or an array of
floats to store this data.
Note that you'll also need to add various handles to these variables in your
`ShaderProgram` class. We leave it to your capable hands to determine how to
instantiate these handles, as well as how to use them to communicate with your
GPU.
__Note that if you want to use `in` variables that are integer types rather
than float types (e.g. `ivec2` compared to a `vec2`), you'll need to use the
`glVertexAttribIPointer` function (note the "I" between "Attrib" and
"Pointer") in `ShaderProgram::draw`__
Coding Style (10 points)
-------
We will provide you with feedback on the organization and clarity of the code
you have written for this assignment. Please refer to our course style guide as
you implement your shaders and VBOs.
Extra Credit (Maximum 30 points)
---------
Make sure you include a `readme.txt` file in your repository that lists which
extra credit features you implemented and how to access them.
### Heat-diffusion skinning (15 points) ###
Rather than a naive distance-based skinning function, implement a heat-diffusion
style skinning function.
### Dual-quaternion skinning (15 points) ###
Implement dual-quaternion skinning in your shader rather than linear blend
skinning. For additional points, implement both types of skinning and allow the
user to toggle which one is used to render the mesh.
### Skin weight editor (15 points) ###
Allow the user to interactively alter the influence a given joint has on
vertices. For example, if a vertex is influenced by joints 1 and 2 but the user
wants it to be influenced by joint 3, they could select joint 3 and that vertex
and replace joint 2's influence on that vertex with some influence by joint 3.
The user could then increase the influence of joint 3 on that vertex. As another
example, the user could select a set of vertices and one joint and set them to
all be influenced by that joint by a weight of 0.75, replacing whichever joint
had less influence.
Submission
--------
We will grade the code you have pushed to your GitHub repository, so make sure
that you have correctly committed all of your files! Once you have pushed your
finished project to GitHub, submit a link to your commit through the course
dashboard. If you click on the Commits tab of your repository on Github, you
will be brought to a list of commits you've made. Simply click on the one you
wish for us to grade, then copy and paste the URL of the page into your text
file.