The overall goal of this project is to create an interactive 3D world exploration and alteration program in the style of the popular computer game Minecraft. This is a group project, with groups consisting of 3 people. Every week for the next three weeks, each member of your group will complete a milestone feature of the project. Please note that late days cannot be used for the milestones of this project since your partners' features may depend on your own feature implementation. The first two weeks' milestones are set features, but the final week's milestone feature may be entirely of your own choosing; a huge number of possible extensions to this project are possible.
Each week, there will be three main features for your group to complete. Each member of your group must choose one of these features to implement, and must implement his or her chosen feature by himself or herself. Each group member will receive a grade for the feature he or she implements; your grade each week is entirely dependent on your work. Since the features of each week affect the features of the following week, you must use version control to collaborate on this project. For this class, you will use Bitbucket, which is a code hosting web site that uses Git for version control. Bitbucket allows users to create private repositories for free, so one member of your group will have to create a private repository to which the other two group members may contribute. It is a good idea for each member to create a code branch for their chosen feature, so that when they commit their code to the repository it does not cause problems for other group members. By the time a milestone is due, each member should merge his or her branch back into the Master branch so that you have uniform basecode to work from the next week.
None. You'll work from the code you wrote in week 1.
For this milestone, each group member will have to handle multiple types of blocks within the world rather than the single, untyped "boolean" block provided in the milestone 1 base code. Discuss within your group how exactly you wish to handle this feature, but we recommend creating an enum to represent these different block types. The blocks that need to be supported are listed below (you may support more if you so choose):
Using the Perlin Worms random walk algorithm, hollow out a set of cave tunnels beneath the surface of your world. To create a single cave tunnel, randomly choose a point beginning at a depth of 32 blocks below the "sea level" of your world (i.e. a height offset of 0 provided by the Perlin noise height field from milestone 1) and start your random walk down into world's sub-terrain. Perlin worms work by sampling 3D Perlin noise at each walk interval to determine the direction in which the walk should move next. For every segment of your walk, choose a tunnel radius (randomly, or with a constant value if you choose) and remove all blocks that fall within this radius. You should halt your walk randomly; after your cave tunnel has reached a sufficiently long minimum length, generate a uniform random number (i.e. between 0 and 1) and stop the walk if the number is less than some threshold, else continue the walk for another segment.
Additionally, at some random segment of a cave tunnel, an ellipsoid-shaped cave of random XYZ scale should also be hollowed out. If you so wish, you may use 3D Perlin noise to distort the surface of this ellipsoid to make it seem more natural, but this is not required. The bottom 10% of blocks within this cave should be filled with LAVA blocks. These blocks do not need to simulate fluid motion as they do in actual Minecraft; they may be static blocks just like all the others.
Rather than having your tunnels extend potentially infinitely downward, set a maximum depth for your world of 128 blocks below "sea level". At a depth of 128 blocks, a layer of BEDROCK should be generated; this block should not break if the player left-clicks on it, in order to prevent the player from falling into the lack of terrain below.
As one final additional feature, randomly distribute COAL and IRON ORE blocks throughout your tunnels and large caves. We won't mandate an exact way to do this, but one interesting way might be to replace a "removed" block with a COAL/IRON ORE block as you hollow out your tunnels and caves.
For this week's OpenGL feature, you'll have to implement several components:
Since there is no algorithm in place for determining which blocks should be of what type, for now you may use a simple height system. Blocks that exist at least 16 blocks below "sea level" (i.e. a block height of 0) can be of the STONE type, and the rest can be of the DIRT type. Blocks that make up the topmost level of the Perlin noise terrain should be GRASS blocks; in other words, if a DIRT block is bounded by empty space directly above it, then it should be GRASS instead. If you want to test block appearances, you might consider setting keyboard input that has the player place a particular block in front of them.
When a block has a particular type, the texture applied to it must represent its type. Use the image linked below as the basis for your texture atlas. The textures you should use are labeled in the image displayed below. Remember that UV coordinates have a range of 0 to 1; the image below is divided into 16x16 block faces, so a single block face ranges from <x, y> to <x+1/16, y+1/16>.
When a block is a LAVA or WATER block, its UVs should be offset in your GLSL shader based on an incrementing time variable. Note that there are rows of WATER and LAVA face textures in the provided texture image; you can repeatedly move the UVs of a WATER block or LAVA block across this row to give the illusion of moving fluid across the block surface.
The cosine power for the Blinn-Phong reflection model in your shader must also vary depending on block type. We will not define exact powers per block type, but in general if a block is made of a "harder" material then it should have a tighter specular reflection (i.e. a higher cosine power). For example, a STONE block should be shinier than a DIRT or GRASS block, which should be nearly Lambertian in appearance and therefore should have a low cosine power.
For 10 extra credit points, use a texture map to determine cosine power on a per-fragment basis rather than on a per-block basis. You'll have to design your own texture to make this work, but you'll be able to render blocks more "accurately", such as the metal bits in ore blocks being shinier than the stone around them.
Click here to download the Minecraft block textures.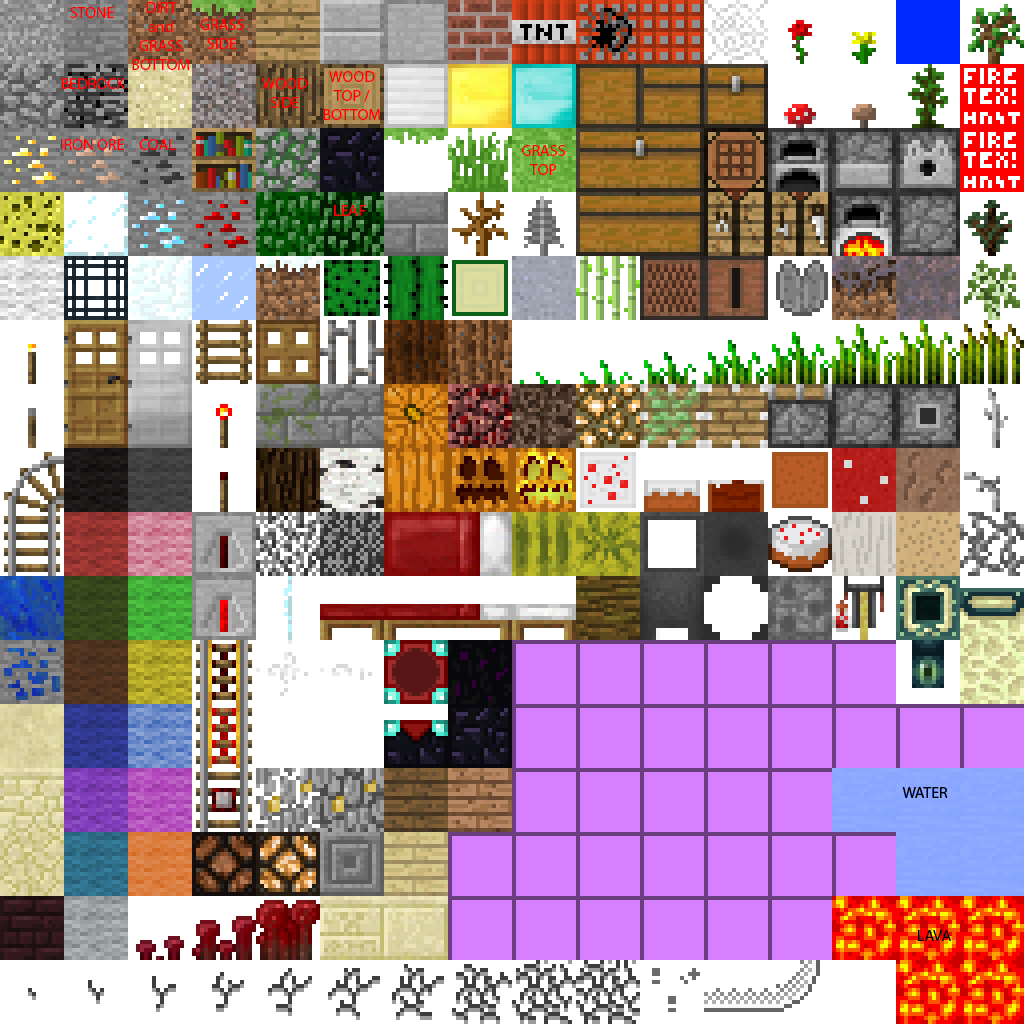
Using a 2D L-system grammar structure, create at least two different branching river paths to place in your world. One river should be relatively straight, with a few small streams that branch off of it (these streams should be thinner in radius than the main river trunk). The other river should be winding and should begin to branch fairly quickly, looking more like a river delta than a main river body. Both river grammars should incorporate random numbers to influence path orientation and probability of branch generation. Your L-systems should be fairly large in scale (on the order of tens of chunks) in order to properly showcase their structure, as the Minecraft-style world is fairly low-resolution when it comes to geometry.
Once you've generated a river, you should project it into your terrain so that the WATER blocks it consists of rest at a height of 0. Any terrain that nears your river should gradually slope down to a height of 0 rather, say, than having your river bore down through a mountain. Note that you should create rivers after the Perlin terrain has been created. A simple way of creating terrain that slopes toward a river is to simply carve away terrain at the edges of the river, gradually increasing the height at which terrain is allowed to exist until you reach either a certain height or a certain distance from the river.
In order to properly view your L-system, you should enable the character to fly by pressing the F key on the keyboard. This makes the character no longer subject to gravity, and be able to move upwards by pressing E and downwards by pressing Q. Furthermore, the character should no longer be subject to terrain collisions.
Make sure your homework compiles in the Moore labs. We will deduct points from any homework that does not compile, and possibly give a 0 grade if the compile errors are numerous. After you have tested your program, zip the topmost folder of your project and submit the zip to the class web site.
Each group member should submit their group's code, especially if a group was unable to integrate each member's code by the submission deadline. Remember to document in your readme which team member implemented which feature.